Install MySQL In Ubuntu On VMware And Connect Through The Host Pc (windows or any host pc)
This article explain how to install MySql 5.5 with Ubuntu 12.04 on VMware (VMware Workstation 8.0.1) and connect through the virtual pc to access the MySql databases in Host pc (Windows or what ever os on host pc).
1.Install MYSQL On Ubuntu 12.04
1.Install MYSQL On Ubuntu 12.04
sudo apt-get install mysql-server
(make sure you are log in as root user,fast internet connection help to download package's correctly.if network connection slow,then download packages may be corrupted!)
2.Install MYSQL Workbench
sudo apt-get install mysql-workbench
sudo service mysql restart (this 'sudo' command not recommend if you are log in as root user.)
3.Host pc network connection parameters:
Disable other network connection as below.
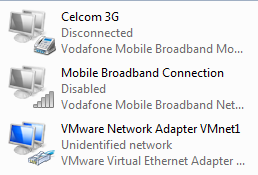
figure 1.0
1.Goto VMware network adapter properties
2.Checked VMware Bridge Protocol.
3.Select appropriate ip range. VMware set default IP range
something like 192.168.###.###
eg: 192.168.137.1 <- and="" be="" equal="" font="" guest="" ip="" must="" nbsp="" ost="" range="">
4.Guest(VMware - Ubuntu) pc network connection parameters:
1.Goto Network settings (top right corner)
2.Goto Edit Connections...
3.Select Wired Connection1 and click edit button
4.Select IPv4 Settings and Set Method as Automatic (DHCP)
5.Don't set DHCP client id or routes
6.Click available to all users ,then save.
Check whether ip address in a same range(first 9 digits must be same).(host ip range 192.168.137.###) guest must be 192.168.137.###)
To check above connection information's click network connection icon on top right corner of desktop(ubuntu) and select connection information as below.

figure 2.0
5.Create MySQL user (type these command in MYSQL command terminal)
open terminal and type mysql -u root -p
then type your root mysql password
then type
create user 'username'@'192.168.137.218' identified by 'your-new-password'
eg:
create user 'abc'@'192.168.137.218' identified by 'abc123'
create user 'abc'@'%' identified by 'abc123';
5.1 Replace username with your new user name to given and insert new password in to 'your-new-password'
5.2 Make sure your ip address is should be ubuntu-pc's IP address
eg: 192.168.137.218 in figure 2.0
5.3 Then grant privileges to above user
grant all privileges on *.* to 'abc'@'%' with grant option;
5.4 Then flush the privileges
flush privileges;
5.5 Restart mysql services
type this
service mysql restart;
5.6 Then goto host pc (your windows pc)
used any MySQL GUI or command line program and set the particular parameters.
eg:
mysql user: abc
host ip : 192.168.137.218 (ubuntu-pc ip address)
password : abc123
Thats all......Have FuN.....
------------ SOME USEFULLY COMMANDS ON UBUNTU -----------
(shell prompt type following command)
To login as root user in mysql
mysql -u root -p
To login with host name
mysql -u root -h myserver-sever.com -p
To Login with host ip address
mysql -u root -h 192.168.137.218 -p
To restart mysql services:
service mysql restart
To stop mysql services:
service mysql stop;
To start mysql service
service mysql start
create user ('%' mean any host )
CREATE USER 'freevbs'@'%' IDENTIFIED BY 'passpass';
Granted all the privileges to user freevbs
grant all privileges on *.* to 'freevbs'@'%' with grant option;
To flush privileges (alredy login in mysql )
flush privileges;
try login with freevbs
mysql -u freevbs -p;
onece you login you can check users
SELECT USER(),CURRENT_USER();
More MySQL Commands please visit below url:
http://manpages.ubuntu.com/manpages/lucid/man1/mysql.1.html
------------------------------------------------------


Comments
Post a Comment